Tuesday, March 25, 2014

My Altoid Tin Challenge Miniature and how I made it

Altoid Tin Challenge

Back in January I issued a challenge to the LittleEnoughNews yahoo group to make a miniature using an Altoids tin or similar tin.  Due to other real life and miniature activities I wasn't able to get mine done.
The challenge produced some wonderful project including a Wizard of OZ, ME theme, Boggy bottom, something with cupcakes, and several more that I can't think to name right now.  All of which are posted to the group.  If you want to see those photos, you will have to join the group as I don't own those pics.


My Challenge project

When the challenge was going on I pulled out a tin I had on hand.  I even pulled a few items to go in it, but just wasn't able to make it then.  This week I took the time and it went together fairly quickly.
I had already determined the arrangement of my tin on its end open like a book. I even found a plastic box for that I would use.  These steps certainly helped speed the project to completion.

Base and Floor

I measured the box and cut a piece of foam core board for the bottom.  I then cut a groove in it to rest the lid portion of the tin.  Next I cut a second piece of foam core board and this one I started marking it so could fit into the depth of the tin lid and bottom. 
Here are the results of the cutting of these two pieces, Base and Floor
 The piece on the right is the underside of the floor.  One can see the notches and areas cut away to fit the tin exactly.

Here is the floor with the flooring added.  The flooring was a sample card obtained from a home improvement store to show a crackle finish.
Here is the under side of the floor in the tin itself

Wallpaper

Once I was satisfied with the floor and base, I moved on to the wallpaper.
I have a book that I use to store wallpaper (a three-ring binder with plastic sleeves).  Wallpaper for smaller scales is so much easier to store.  But this book does have pieces of wallpaper that could be used for one-inch (1:12 scale).  I have one sleeve dedicated to raggedy theme or coordinating styles/colors.  I did find some to use so that helped speed the project up as well.
To fit the wallpaper into the tin, I cut a piece of plain paper the shape of the tin lid (used the lid as a template).  Then I pressed this paper template into the lid and cut away anything that was bent.  Once I had that, then I used another scrap of plain paper to determine the width the wallpaper needed to be for this tin.  Cut a strip wider than the tin lid template and then pressed it inside.  Repeat for other direction.  Then I could cut the wallpaper the approximate width and height needed.  
In order to avoid pressing the wallpaper into the tin and bending it unnecessarily, I placed the lid template on the wallpaper and made some cuts to the edge of the template.  Then I inserted in the lid and pressed into shape.
I learned that I didn't need so many cuts - see this pic shows the lid wallpaper and the box wallpaper after being trimmed.  Note how the one on the right has wings at the top and bottom, that was really what was needed.
When folded into the tin the wings go behind the sides or towards the bottom.
Once the wallpaper was ready - I decided to do something about the shiny edges of the tin for the room side.  I didn't want to paint as was concerned it would flake off before I got the project finished, although that might not have been the case.  Instead I used a permanent marker in a dark blue.  (I got this set of markers for a totally different craft project, but they are proving themselves of greater value more and more.)
 I test fit everything - tin, floor, base, wallpaper all at the same time.  Once I was satisfied this was all I needed to do, I added glue to the interior corners of the tin and added the wallpaper. 
I did trim the paper so it was just below the edge of the tin.
Then I set the floor in place, checking it.  Ok, good, the next step was to glue the floor in place.  After I was satisfied with the floor and tin together against the base, then is when I glued to the base.
As I looked at the project from all sides I realized I was premature of gluing the base to the floor.  I decided that I needed to add some of the flooring to the outer portion of the tin since it showed.  I pieced this together best I could - would have been so much easier to have that in place before I glued it all together.  I also added a piece back to the side of the tin where I had lopped it off.  This piece of foam core board was cut with a curve to fit up next to the box of the tin. 

This pic shows how that foam core board had to be added to fit up against the box section on the left and a small gap still on the right side.  Also shows how I pieced the flooring in the back and outside of the tin.  Looks like I need to fix a spot.

Wood trim around the base

Lastly I pulled out some wood veneer on a roll that I had been itching to use for some time. This comes pre-glued on the back. It works by ironing it to whatever is being edged.  Since this glue requires heat I made sure to test a sample of foam-core board first.  My test was very successful so I went ahead and cut my pieces. 
Wait actually I cut my pieces, painted them, trimmed them and then realized I should test.  After the test and then after successfully applying the pieces using my iron I would say that it would have been better to apply the wood first - aligning to one edge.  Then trim against the other edge.  Rotate to another side and repeat. 
The test that I did was really clean when I trimmed the wood and glue away, but having already pre-painted and pre-cut my pieces I was stuck with dealing with the glue that squeezed out.  It isn't the cleanest I would like even with going afterwards with my craft knife.  I also ended up repainting as my color was uneven.  If however I had been able to sand against the flooring edge then the glue excess wouldn't have been a problem.  
But I do love - love this product, how easy it was to use and the look I achieved even with my excess glue.  I even considered a separate blog post about using this wood veneer for edging.
So here is the finished piece with all the swaps added
To see more photos of the finished piece, check out my picture trail album.

In the shelf just under the house is even a piece of 'glass art' I made using plastic that I posted about here.
It really is a dish but not so obvious here in the shelf.  Below is a star shaped bead.

Thursday, March 13, 2014

How to make glass art from plastic

How I made art for my glass studio in miniature using plastic

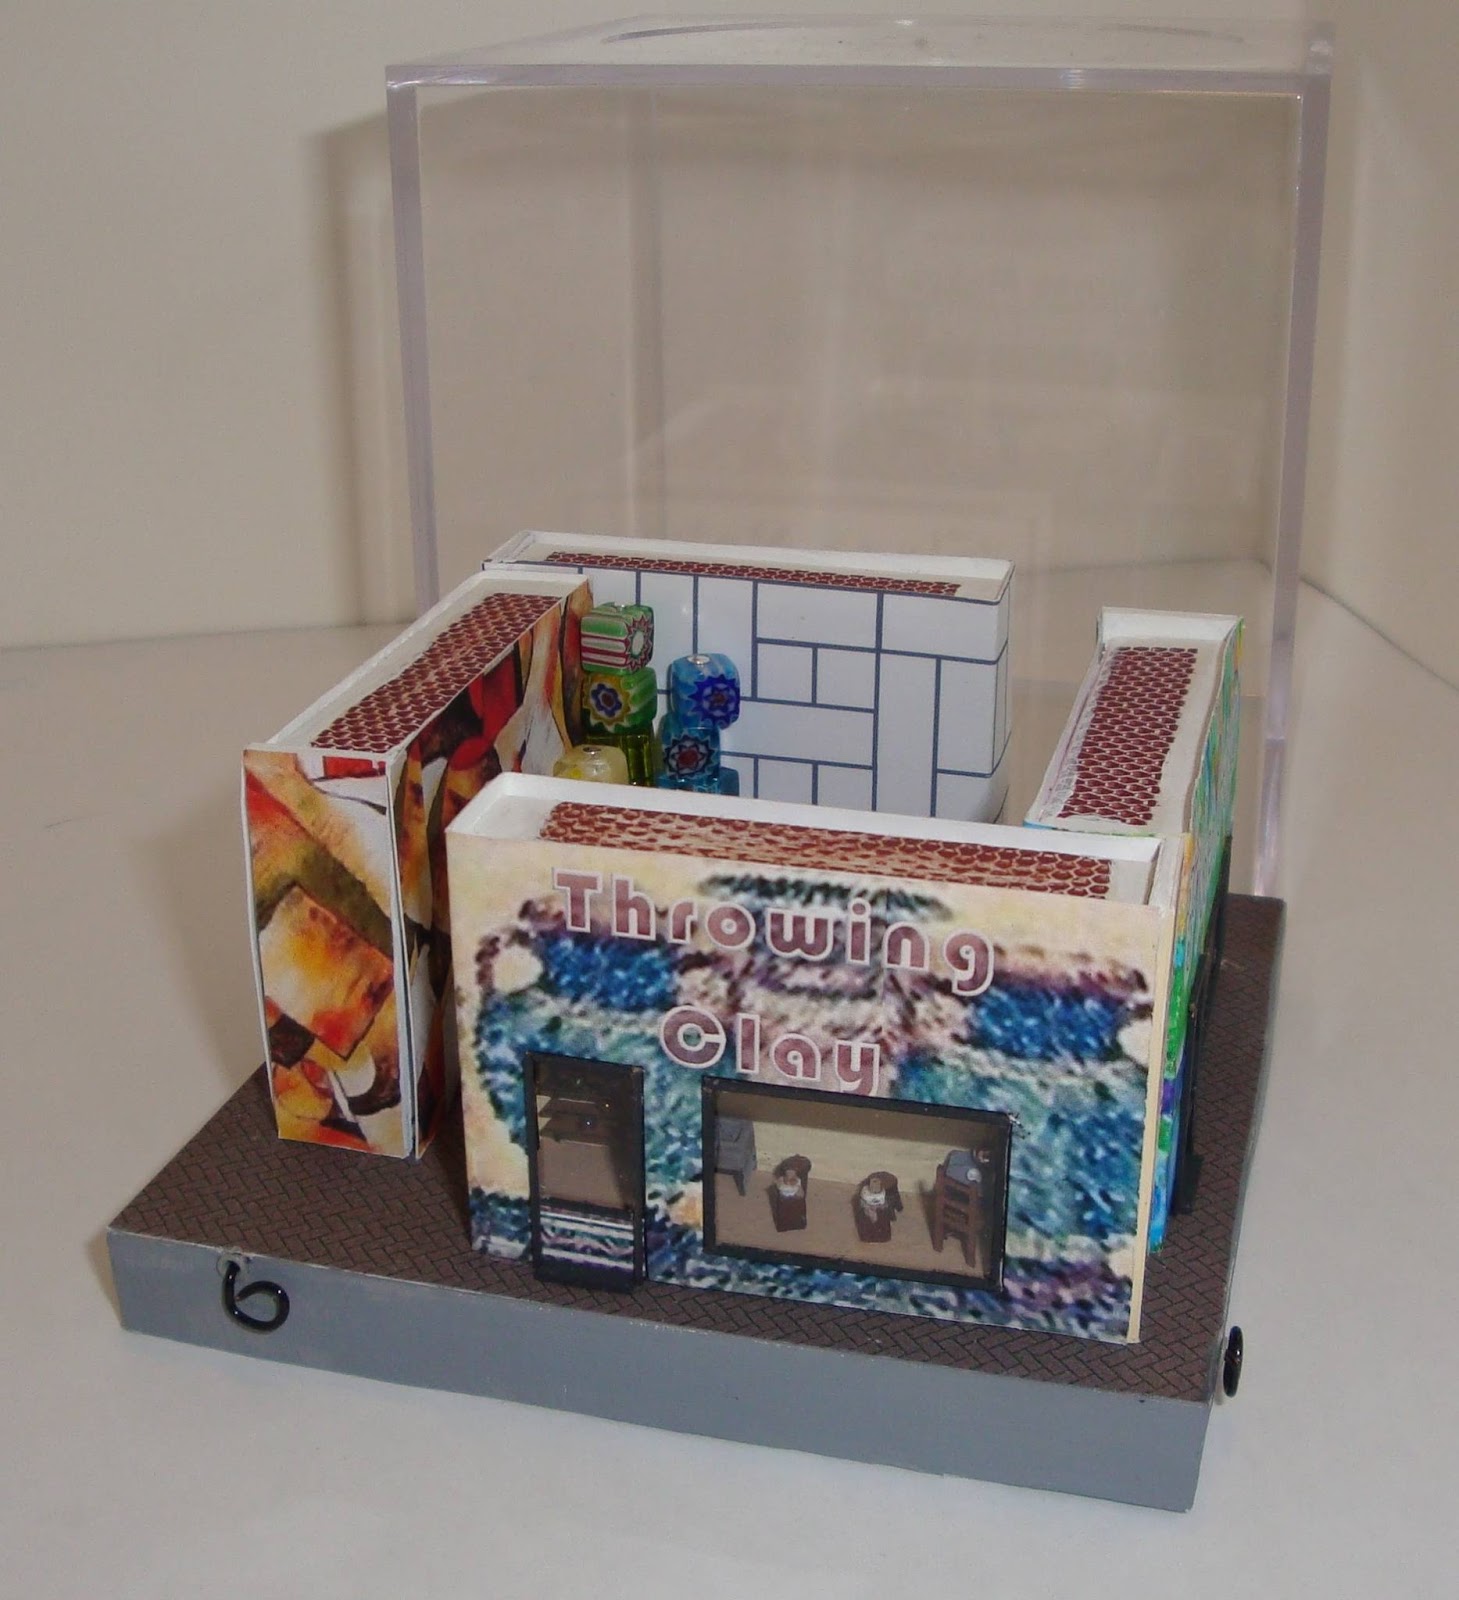
Recently I designed a workshop for MicroMini Online Convention with the theme of Art in Miniature.  My design was four art studios in matchboxes.  View photos of this here or view my prior blog post about that project here.
To fill up each studio I used bits and beads to represent the student artwork.

Please note pictures are not to scale - some may be greatly enlarged relative to actual size

Glass Maker Studio Artwork

For the other studios I had beads and fibers that I could use to represent the student artwork but for the glass one I thought of a how to I had seen using a tube and a flame to make a bottle in miniature.  I figured I could play with plastic bits and flame and see what I could get.  I was super pleased with the results and had the best time playing with this process.
Also I looked for plastic to use as the door and window glass, I ran across a package of Shrink Art.  I set it aside for working with later as it was too thick for the door and window glass - well I thought it was at the time and knew I would come back to it.  But it also got me to thinking of other plastic I might have and that lead me to the simple plastic beads I had from a prior ornament project.

The following process involves using a candle flame and extreme caution is recommended. An alternative to flame is the use of an oven.  However caution when handling once heated would still be very important.

The Tools and Materials

Here are the tools and materials I used:
Metal tweezers, pliers, scissors, candle, matches, permanent markers, shrink art, plastic beads, metal rulers, aluminum foil, hot pad or folded towel, phillips head screwdriver, wire, flat metal ruler for pressing against

The Process

Having seen the bottle tutorial, I knew that plastic would melt or become pliable if heated.  I really had no idea how that would work so I just played around.
I started with holding a plastic bead in a pair of tweezers.  I knew that the tweezers being metal that the heat could transfer and travel to my fingers.  However I didn't have any issue with that with my tweezers.  But please use caution to assure you don't get burned.  The bead begins to soften before the heat transfers.  Or the bead gets too much heat and catches fire.  But if that happened I just blew it out.  Sometimes the fire on the bead discolored it and sometimes I blew it out soon enough that it didn't.


Here is a bead before it has been heated - you can still see the facets of the bead.
Here the bead has softened over the flame - the green bead is waiting to be touched with the softened bead.  The green bead hasn't been heated, but it could have been prior to this step.
It was by accident that I discovered that a heated bead would stretch when it touched unheated plastic.  So that was my next phase of playing.
Once the bead has softened, is when it can be shaped, squished, twisted, pulled, and cut.  I simply played around here to see what I could do with it.
I even added a bead to a wire head pin.  The head keep the bead on and I pushed with my pliers to shape into a flower. 
Once I discovered the stretching process from touching a piece not heated I was off and running with that phase.

 Great potential here with the stretching.  This reminds me of glass art made by a famous artist.  But a project for another day.


The stretching process does require a bit of finesse - can't pull too fast or the plastic breaks.  Also the heated piece does need to be well heated (but not on fire).
Here is some flowers made with this process

The bits I made for the studio were mostly made from this process so far.
All the items on the shelves were made by just heating the beads and either stretching them or cutting them.  As in if the bead was too large, then I used my scissors while the bead was hot to cut off a portion.

The green statue in front of the shelf was my next phase.

Shrink Art

The shrink art comes in plastic sheets.  I knew it could be heated in the oven, so I experimented with the candle flame.  That worked.  I also knew that to add designs to the shrink art could be readily done with permanent markers.  Luckily I have a whole set in my stash.  (Bought those for a totally different project with a 40% off coupon.)  Plastic sheets meant trying to cut them with scissors - works, and with punches - works but far more difficult as the plastic is thicker.
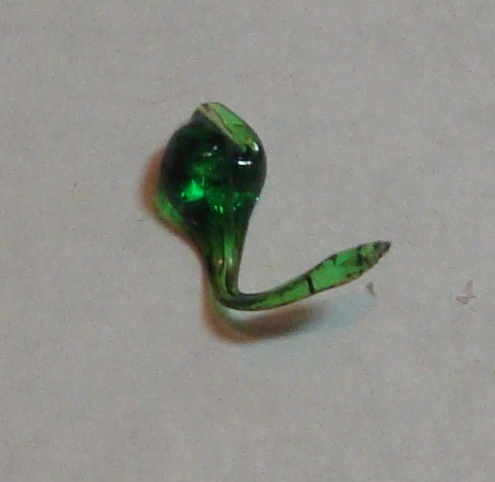
Here is a star shape I cut out with scissors, although the one in my studio was done with a punch.


This second pic is after it has been heated.  The one disadvantage to shrink art was that it tended to thicken.  That's fine for some projects but not for all miniature ones.
Sorry these are blurry, but maybe it is clear what I want to show.  The star on the right was a punched one.  The streamer tail was made because holding it in my tweezers while heating it didn't shrink.  I played with the tail with another pair of tweezers or pliers to get the stretch.  The blue pointed shape on the left was the outside of the punch shape from the star.  It squished on its own due to the uneven heating.
The roundish thing at the top was just a roundish piece cut with scissors, marker squiggles for design, then heated some to shrink and shape it.

The green scuplture above in front of the shelving - that was a scrap from punching.  I added color and then heated and shaped it.  A similar item was made same way and added to the front of the studio.
It is the clear sculpture next to the door between door and window.
When twisting the plastic, it was important to hold it in place until it cooled.
Here is another example of the before and after with the markers

Another way to heat and shape

So I decided I also wanted to make somethings in 1:48 scale for a swap I needed to do.  I had already experimented with the beads on a head pin so I knew I could make something like a bowl like shape with the shrink art, but when I tried it I was not so pleased with the shape and also it tended to become too thick for my liking.


These bowls were all made with shrink art that I colored with the markers.
I was also getting tired of holding the pieces with tweezers - not that the tweezers getting hot was a problem, just the squeezing.
My solution was to try heating the plastic in aluminum foil.  This I did have to hold with tweezers as the foil transferred the heat far too quickly.  Secondly the foil had a tendency to make the candle go out - too close to the mouth of the jar.  I experimented with adding holes to the foil so air could flow in, but was too crudely done so for a bit I just held the foil with tweezers.
however for making swaps, I decided that I should add a wire holder over the candle so the foil could rest on and above the candle.  This worked very well.

Once I used scissors to make my plastic piece smaller - heat then cut, I was able to heat nicely in the foil.
Although I could also heat in the foil and then cut after it had melted, but only after cool and held over the heat separately.  The plastic while melted tended to stick to the foil, so couldn't cut it while melted if in the foil.
 Bead before melting
In this second picture, maybe can see that the plastic is really melted and in a puddle.

The wire holder allowed me to rest the foil above the flame and then I could use the tweezers to pick up the foil and quickly rest it on a hot pad.  The hot pad wasn't necessary although I figured it gave me the ability to press and have a rounded surface with the foil.  I pressed the heated plastic with a phillips head screwdriver and rotated to make a fluted bowl.
The smaller blue bowl was made from half of what the larger blue bowl was made.  So to make the 1:48 scale art bowls for my swaps, I used a third of the beads I had. 
One thing that happened while using the screwdriver is the fluting sometimes had flashing (excess thinner plastic).  To get rid of that, I just held over the flame using tweezers - for a short time to let the flashing absorb back with the rest of the plastic.


The first pic shows with flashing and this second without. 

Another source of plastic I was recently made aware of but haven't used yet is plastic cutlery.   This might be easier to cut up into pieces first with wire cutters, but other than a different source for materials I don't know of any additional reason to source them if the plastic beads are available. 

Tuesday, March 11, 2014

1:144 scale MM Arts & Craft Center

Art in Miniature

In 2013, the theme for the MicroMini yahoo group online convention was announced.  The first thing that came to mind was my semester spent at Appalachian Center for Crafts (ACC).  At ACC they covered 5 different art media: Clay, Glass, Wood, Metal and Fiber.  I took an intro class in both Fiber and in Glass.  Although I really enjoyed my time there, I did decide that it wasn't for me so I didn't continue.  In hindsight, I wish I had pursued a degree in Fine Arts instead, but I digress.
For the convention I decided to offer a workshop, so I came up with this.  I did have to narrow the selection to four media - however I switched to painting as one instead of wood or metal.  I narrowed the selection only due to the size of the cover I wanted to include.  I really prefer having a cover anyway. 
Choosing matchboxes to house this is almost like second nature to me for micro mini or 1:144 scale miniatures.  They capture my love of using unusual containers to make things in for one.  For another they just have a good size for a simple building.  They may not be very deep but that also works if you don't want to get too in-depth into a subject.  Oh and they are also very cheap to use and very easy to work with.
Here is the result of that creation:

Sliders - oh the decisions

I don't know why I was obsessed with a means to open the drawers without touching them.  My last endeavor with matchboxes created a really simple extra end that made it super easy to open them.  See that project talked about on my blog here or just in photos here. I discussed this with my hubby as I really wanted a mechanism that allowed me to turn a knob and open all four of them at once.  Since I had already decided that I was going to do this as a workshop it was critical that it not be too expensive to do or to difficult to do.  Doing it for myself, I could have designed something I was happy with.  But I had decided it would be a workshop so simple won out.  What I ended up with was a single wire and groove for the wire for each studio.  Also each wire comes out an eyelet.  Those made a really nice cover for the hole. 
Here it is with all the drawers out and you can see the sliders:

Filling up the Interiors

 I work full-time and so my mini-time is precious.  I knew I could develop my own kits to go inside, but to make things easier on myself, I contacted Susan K. of sdk minis.  I asked if she would be willing to work with me on providing items to go in my studios.  I had already selected several of her kits to purchase but there were a few others that we worked together to come up with what I wanted.  She also had several new kits she had worked on as well that were right in line with my ideas. 
I ordered a number of kits and then it was time to put them together.  I haven't made that many 1:144 scale kits at once.  I might not have done them all if I hadn't wanted them all finished to show with my workshop.  My workshop was just the studios and artwork to go in them - leaving the actual furnishings to sdk minis kits.
For the student artwork I used a lot of beads and other bits.  I printed a few things for the walls.  I collected images from the internet and resized them down to suit what I wanted.  The most fun was making the Glass artwork.  I will cover that in another blog post.  I will say that I used plastic to make my glass.  Both the window and door glass and the glass artwork were made from plastic.

The Courtyard

In deciding that this was four studios and they were somehow connected, I designed a center courtyard that would be surrounded by the studios.  The matchboxes could then all be seen from the fronts to the outside.  Inside the courtyard I envisioned a place for the students to sit and also for people to visit and see the artwork on display at that time.  This type of artwork can be quite large so I allowed my choice of materials for these to be larger than what went inside.  Although when it comes to artwork, artists seem to love doing larger than life sculptures. 
One idea that I had and clung to longer than I should have was to have beads on the slider wires.  The idea was to have the beads as sculptures at the end of a matchbox.  These had to be such that the beads were sturdy as well as the wires.  While I worked on this, I also clung to the wire I had first decided on.  I choose it simply because I knew it was sturdy - not easily bent, but it was thin.  Unfortunately that thinness was really what wasn't working.  I discarded the idea of the beads on the slider wires as sculpture long before I tried another type of wire.  It was only someone else's suggestion (at my request for suggestions) to try something else that didn't work to pursue the other wire options in my stash.  I share this with you so that maybe you won't cling to an idea that it has to be this when it doesn't appear to be working.  Also it is a reminder to myself to be open to any and all options. 
Here is the results of the courtyard
My choice of cover did limit how the matchboxes could be laid out.  It narrowed the outer sidewalk area to just that.  Also the spacing between them was tight, but I am pleased with the results.  

One of these days I think I would like to create a companion piece that can live next to this one.  It might have a shop for the students to sell their artwork or maybe a metal working studio....

to see more photos of this project - pop over to my picture trail and view its album
and stay tuned for the how to on making the glass art work - coming soon to this blog