How I made art for my glass studio in miniature using plastic
Recently I designed a workshop for MicroMini Online Convention with the theme of Art in Miniature. My design was four art studios in matchboxes. View photos of this here or view my prior blog post about that project here.To fill up each studio I used bits and beads to represent the student artwork.
Please note pictures are not to scale - some may be greatly enlarged relative to actual size
Glass Maker Studio Artwork
For the other studios I had beads and fibers that I could use to represent the student artwork but for the glass one I thought of a how to I had seen using a tube and a flame to make a bottle in miniature. I figured I could play with plastic bits and flame and see what I could get. I was super pleased with the results and had the best time playing with this process.Also I looked for plastic to use as the door and window glass, I ran across a package of Shrink Art. I set it aside for working with later as it was too thick for the door and window glass - well I thought it was at the time and knew I would come back to it. But it also got me to thinking of other plastic I might have and that lead me to the simple plastic beads I had from a prior ornament project.
The following process involves using a candle flame and extreme caution is recommended. An alternative to flame is the use of an oven. However caution when handling once heated would still be very important.
The Tools and Materials

Metal tweezers, pliers, scissors, candle, matches, permanent markers, shrink art, plastic beads, metal rulers, aluminum foil, hot pad or folded towel, phillips head screwdriver, wire, flat metal ruler for pressing against
The Process
Having seen the bottle tutorial, I knew that plastic would melt or become pliable if heated. I really had no idea how that would work so I just played around.I started with holding a plastic bead in a pair of tweezers. I knew that the tweezers being metal that the heat could transfer and travel to my fingers. However I didn't have any issue with that with my tweezers. But please use caution to assure you don't get burned. The bead begins to soften before the heat transfers. Or the bead gets too much heat and catches fire. But if that happened I just blew it out. Sometimes the fire on the bead discolored it and sometimes I blew it out soon enough that it didn't.


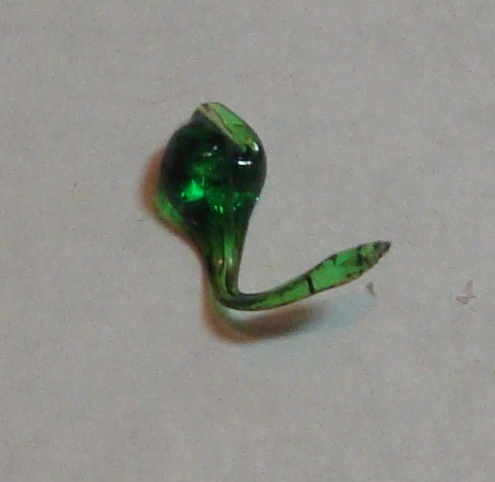
It was by accident that I discovered that a heated bead would stretch when it touched unheated plastic. So that was my next phase of playing.
Once the bead has softened, is when it can be shaped, squished, twisted, pulled, and cut. I simply played around here to see what I could do with it.
I even added a bead to a wire head pin. The head keep the bead on and I pushed with my pliers to shape into a flower.
Once I discovered the stretching process from touching a piece not heated I was off and running with that phase.


Great potential here with the stretching. This reminds me of glass art made by a famous artist. But a project for another day.

Here is some flowers made with this process

The bits I made for the studio were mostly made from this process so far.

The green statue in front of the shelf was my next phase.
Shrink Art
The shrink art comes in plastic sheets. I knew it could be heated in the oven, so I experimented with the candle flame. That worked. I also knew that to add designs to the shrink art could be readily done with permanent markers. Luckily I have a whole set in my stash. (Bought those for a totally different project with a 40% off coupon.) Plastic sheets meant trying to cut them with scissors - works, and with punches - works but far more difficult as the plastic is thicker.Here is a star shape I cut out with scissors, although the one in my studio was done with a punch.


This second pic is after it has been heated. The one disadvantage to shrink art was that it tended to thicken. That's fine for some projects but not for all miniature ones.

The roundish thing at the top was just a roundish piece cut with scissors, marker squiggles for design, then heated some to shrink and shape it.
The green scuplture above in front of the shelving - that was a scrap from punching. I added color and then heated and shaped it. A similar item was made same way and added to the front of the studio.

When twisting the plastic, it was important to hold it in place until it cooled.
Here is another example of the before and after with the markers


Another way to heat and shape
So I decided I also wanted to make somethings in 1:48 scale for a swap I needed to do. I had already experimented with the beads on a head pin so I knew I could make something like a bowl like shape with the shrink art, but when I tried it I was not so pleased with the shape and also it tended to become too thick for my liking.


I was also getting tired of holding the pieces with tweezers - not that the tweezers getting hot was a problem, just the squeezing.
My solution was to try heating the plastic in aluminum foil. This I did have to hold with tweezers as the foil transferred the heat far too quickly. Secondly the foil had a tendency to make the candle go out - too close to the mouth of the jar. I experimented with adding holes to the foil so air could flow in, but was too crudely done so for a bit I just held the foil with tweezers.
however for making swaps, I decided that I should add a wire holder over the candle so the foil could rest on and above the candle. This worked very well.


Once I used scissors to make my plastic piece smaller - heat then cut, I was able to heat nicely in the foil.
Although I could also heat in the foil and then cut after it had melted, but only after cool and held over the heat separately. The plastic while melted tended to stick to the foil, so couldn't cut it while melted if in the foil.


The wire holder allowed me to rest the foil above the flame and then I could use the tweezers to pick up the foil and quickly rest it on a hot pad. The hot pad wasn't necessary although I figured it gave me the ability to press and have a rounded surface with the foil. I pressed the heated plastic with a phillips head screwdriver and rotated to make a fluted bowl.

One thing that happened while using the screwdriver is the fluting sometimes had flashing (excess thinner plastic). To get rid of that, I just held over the flame using tweezers - for a short time to let the flashing absorb back with the rest of the plastic.


Another source of plastic I was recently made aware of but haven't used yet is plastic cutlery. This might be easier to cut up into pieces first with wire cutters, but other than a different source for materials I don't know of any additional reason to source them if the plastic beads are available.
4 comments:
Great tutorial! I never thought to use beads, foil, or a foil holder. I have made something similar using bits of plastic packaging: cut out the shape & size you want, color with permanent marker (Sharpies work great), & carefully heat over a candle flame using tweezers in each hand to create any twisting, pulling, etc., you want or do not do any twisting or pulling of the heated plastic to see what neat natural shapes come out of it. I initially learned how to do this (in 1" scale) in my local mini club meeting where our members found out that not all plastic packaging works for this. Part of the fun was experimenting to see what worked & what didn't. We had a lot of fun making these!
Thank you for your fantastic tutorials!
- Corena :0)
Your glass work is very beautiful! Thanks for sharing
Hannah
That is so very cool! I have to try it. Thanks for all the details about the problems and possible solutions to.
Ann
This reminds me of Chihuly glass - Google for further info. Another source for coloured plastic are the soap scoops (usually blue or green) These are very easily cut with scissors into free form shapes, and when placed over a flame can be twisted into very interesting shapes.
Thank you for sharing your techniques with miniaturists!
Jonesy, Victoria, BC
Post a Comment