Showing posts with label 1:144 scale. Show all posts

Monday, October 16, 2017

Wee ME Bookhouse

For each of the persons who participated in Pam Junk's ME challenge, she sent a participation prize. This consisted of two printies to make little houses - a gingerbread house and a ME bookhouse. 
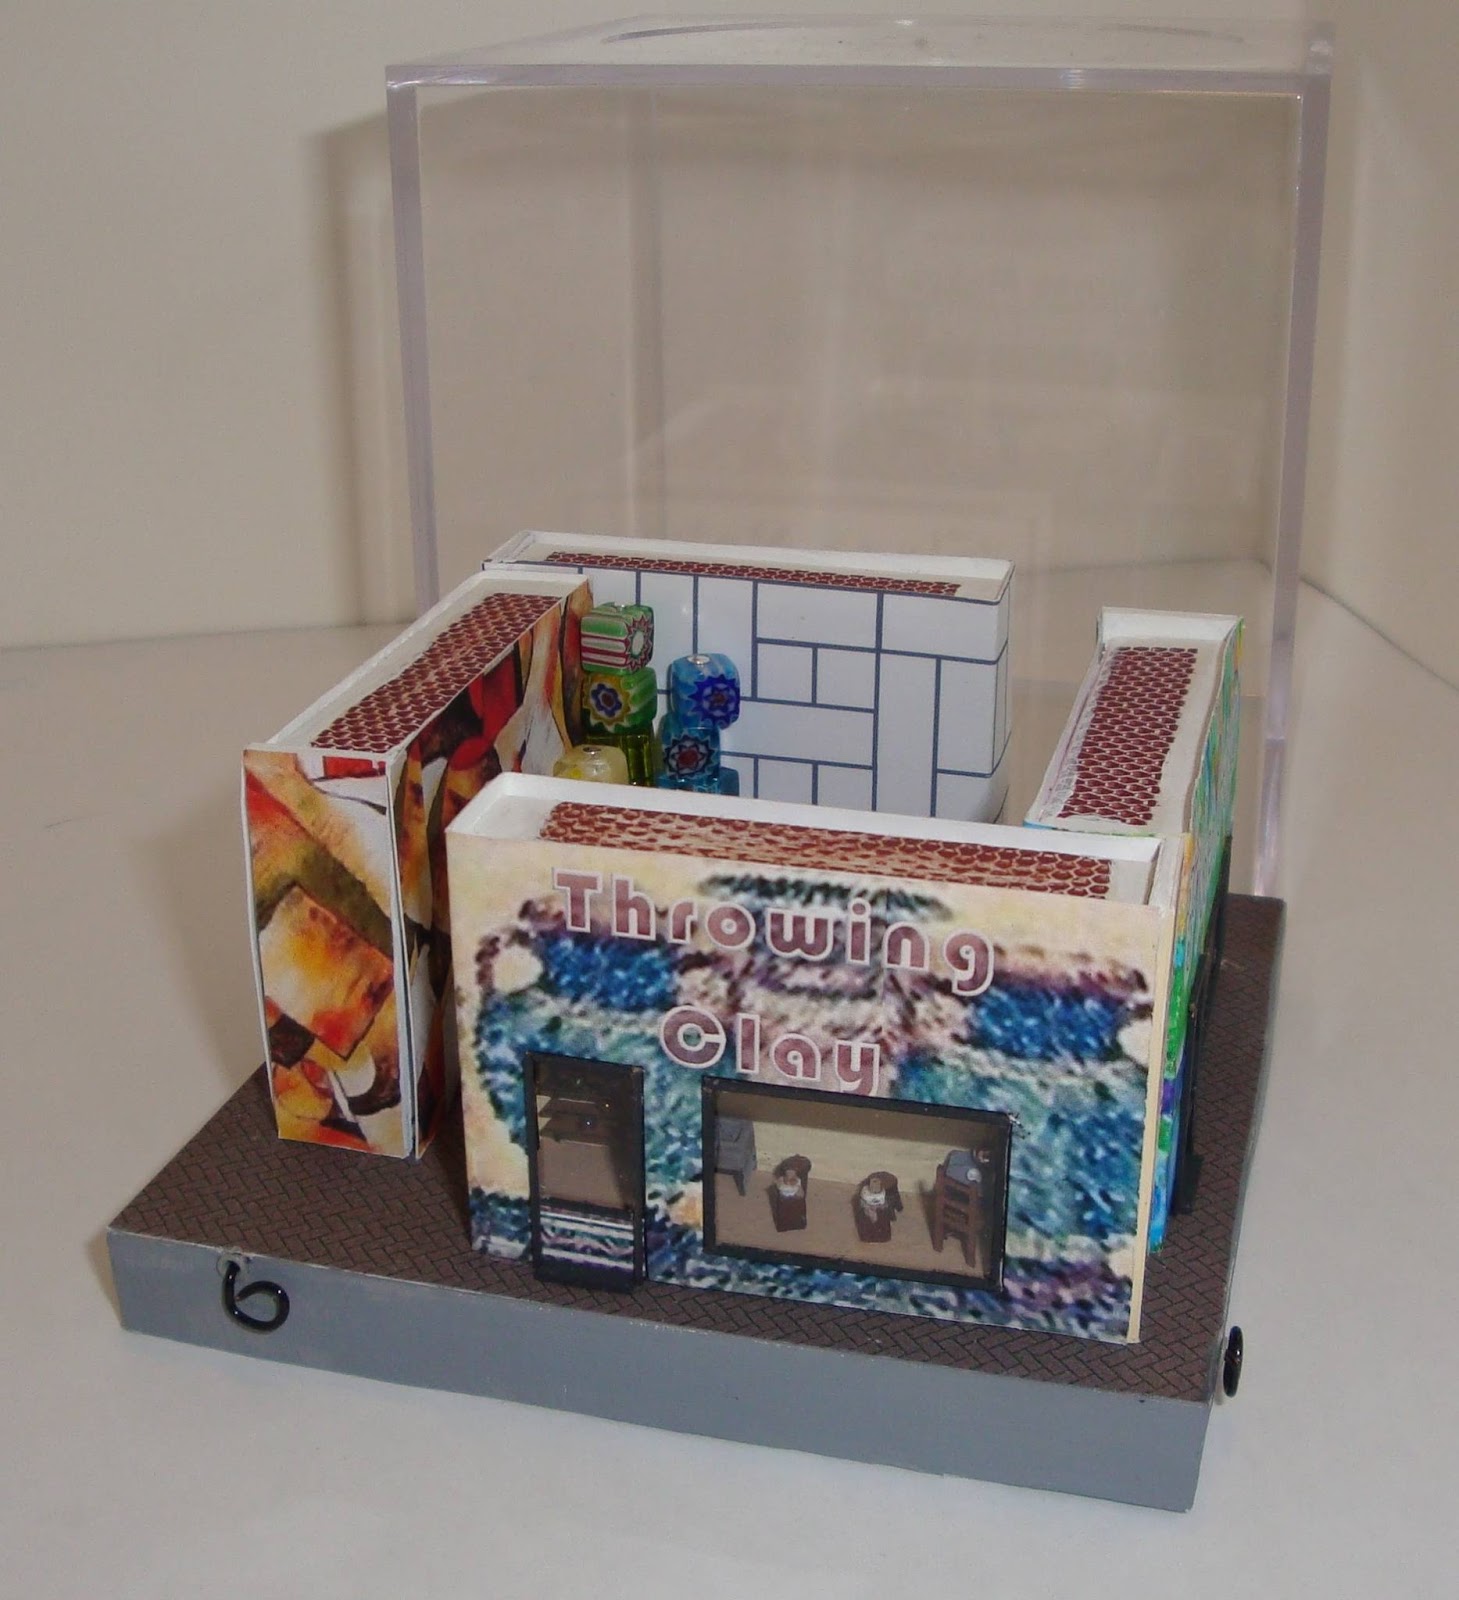
After my initial assemble of this wee house, I decided it needed to be elevated (nicer) and so I found a plastic box it would fit in and added a base.

Here was my thought process:
The plastic box I found was fairly tall relative to the wee house, so I decided it needed a base to raise the house up above the black bottom and fill the clear top without being too high.

Build a base from paper
I pulled out my green scrapbook paper and cut and assembled a simple base (an inverted box). Then when I fit it into the plastic box I realized I had the same problem with the roof I had with the 1:48 scale one - the bottom of house is set to the edge of the base, but my roof wasn't so the house was tilted when in the plastic cover. (This won't do at all.) To solve this problem, I just trimmed the roof.
Next I wanted 'grass', so I pulled out my landscape materials and found a green that matched the paper I had used. I spread glue on the base and proceeded to cover with this fine green foam. Only I realized too late that the foam wasn't fine enough. So I scraped off that foam and then ended up cutting around the house to remove from the paper base.

Build a foam core base
Rather than cut out another paper base, I thought about what other way could I achieve my goal. Normally I would be using foam core or builders foam. Foam core I use is roughly quarter inch thick and builders foam is closer to half an inch. I decided the foam core was the better height.
Using foam core meant I would need to hide the foam. 
I cut a strip of black paper (also scrapbook paper scraps). I cut it long enough to wrap around, but I measure to one side, then bent the corner neatly, then did for the next one. But I forgot to do for the next side. (I'm sure I was in too much a hurry to use glue which tends to get me in trouble.) So I glued to the first and second side. That's when I realized forgot to do the third bend. But I was able to do it before I glued. The last bend wouldn't have been needed if I hadn't somehow got the first side a tiny bit off. Rather than trimming at the last corner I had to trim a little extra to wrap around at the bend. It worked out ok. (The reason I didn't measure and bend all four was due to my concern that the foam core wasn't exactly square to the one inch I had cut to.)

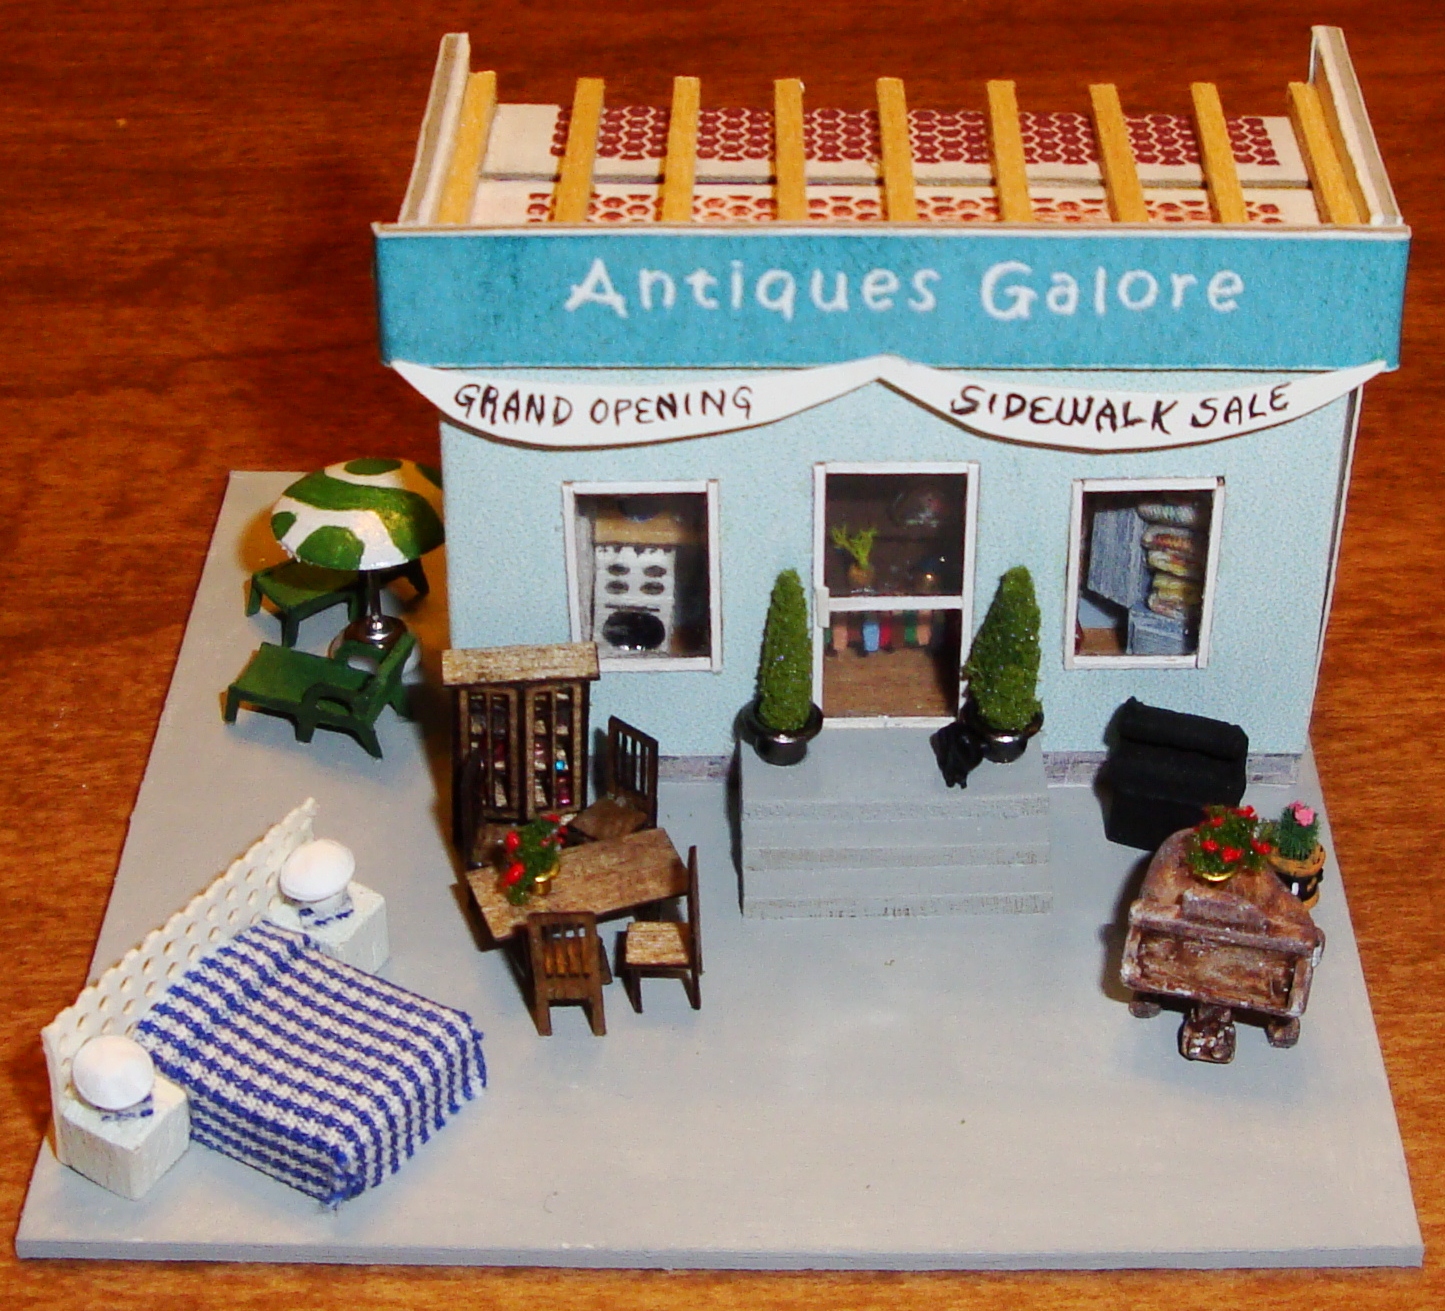
Landscaping the base
For the step and the flagstone I used paper. The step from a thicker paper and the flag stone from thin paper. I glued the step in front of the house and painted it, Then I painted a brown path for under the flagstone. Then I cut strips of the thin paper, then cut into random squares and rectangles, gluing them individually. After gluing both, I painted solid grey on the step and several colors on the flagstone, just dabbing here and there to give a stone look.

I decided to donate the green foam I had used previously and decided to not use. The reason is the color seems too bright almost neon for my taste. I had never used it that I can recall for that very reason - the color seemed unnatural. 
Instead I used a mix of yellow and mostly green that I had in my stash. I am not sure if the product comes that way, or if someone had mixed it. This is the very fine foam that gives a fairly close layer which is closer to scale for this wee little house, (although probably a foot high in real life scale.)

For landscaping, I also use a material that comes in clumps. To get these wee little bushes, I just tore off tiny pieces and glued them around the house.


Decorating the base
The bigger ME book house had wood veneer added to it that I then painted black. I also added a cutout detail around it. Then I had painted white polka dots. I didn't havemuch room to do that on the paper covered foam core base, so I left it as black. (Using colored paper was cool, since I didn't have to paint.) Instead I added the same cutout detail to the black plastic base of the box. Now the wee house and the bigger one coordinate.

I do not have any micro scale furniture at the moment so the interior is empty.

Tuesday, December 8, 2015

Sleigh Bed Village - How I made it

Do you ever have visions of minis that won't leave your mind?
I do and this is one of them.
Last year I started thinking about this project.  I don't even remember the exact beginning but it was to mix scales with the bed that had little houses on it in a pile of snow.  This is similar to art by Colin Thompson.  I even bought his book, "Pictures of Home" as inspiration for this project.
Initially I had thoughts of using this bed that I made 20 yrs ago with my club.  It has since been played with and damaged.  I had given the bed to my daughter 10 yrs ago or more when I downscaled.  (Oh, I just invented that as a word for minis.  But it does describe what I did - changing focus from larger to smaller scale in my case 1:12 to 1:48 or smaller.)  She said recently that the first thing that broke was only one foot so the rest may have gotten damaged in my storing it away until I was ready to fix it.  Lesson here is that if I had done so it would have been fixed and maybe not further damaged.  However I will say that the design of this bed was poorly done in that the sides were done all as one piece.  So the grain of the wood goes horizontal.  For the ends and feet this isn't so good structurally.  Last year I waffled around with fixing this bed, making a new one or buying one.  I never found one to buy and ultimately I put the whole project away in a project box.

Fast forward to now - I was inspired by the maker of the little paper houses I am using, Karin Corbin. She talked about making her 2015 set and shared pics.  So when I finished up the other projects Swaps Mall and then RA House additions, I was inspired to pull this one out.


After a brief examination of the earlier made bed, I pulled out the pattern I had from all those years ago.  I decided I would make a new one.  Only this one was going to have curved ends instead of flat in between the rails. I did of course browse the web including pics I had saved to pinterest to decide on that. This is a free form shape that I did cutting a pattern. 

I lightly glued two pieces of basswood together and drew out my pattern so I would make four end sides.  I repeated with shapes for my long rail sides to go between the end sides.  
The sets of three sides (2 end sides and 1 long rail sides) were all cut out and sanded to match.  Then I separated the pieces I had glued together so I had 6 pieces and all these were sanded very well including rounding the edges.  Well except where the end sides would match up to the long rail sides, I did not sand so they would glue together nicely.

Here is a pic on how the curved bed ends started.  I cut the wood from bass wood the right width and used the height of the wood.  Ok, to clarify, the height is the width of the wood (4 inches) that I cut it from. This means the grain goes across the width of how I will use the pieces. Then I got both pieces wet and I wrapped them around a dowel and this glass. The clothespins are clamping the wood to the dowel and the blue clamps were holding the dowel and the rest of the wood around the glass. I let dry overnight.  I loved doing this technique.  


Only problem was I had already cut the ends of my bed (end sides).  The shape of the dowel/glass combo didn't match, so I had to re-wet.  This time I laid the wet wood over two paint bottles.  Two for each piece - one under and one on top the end.  Then weighted them all down using bags of sand. Hindsight I could have done the wood shaping and then cut the end sides afterwards.
I did have to clamp the shaped wood to hold in the right place when I glued it between the end sides. And even then I had to reglue when I added the dowels.  So maybe add the dowels to the shaped wood and then cut the end sides.

Once my two ends were fully assembled, I added in the long rail sides. I added scrap wood at the joints between the end sides and the long rails for inside the bed. Not sure if this pic shows it very well, but the white piece is the scrap wood.  At the top can barely see that there is a join that the scrap is helping support.


Next I painted this entire frame in off white. I wasn't sure what color to go with. I did my sketches with color and was undecided. Granted the sketches helped me eliminate a few colors. I narrowed it down to red or a blue. I waffled on these two for a day or so.  I was all set to use blue, but when I went through my paint, I couldn't decide again.  So I pulled out my fabric stash.  

I pulled this blue and red pattern out right away and it screamed pick me.  

But I keep looking and pulled out several others.  I even waffled back to the red side and traditional Christmas red and green colors.  I laid these on the bed and I just couldn't decide. So I thought, let's switch gears and make the mattress.

I cut a piece of builders pink foam.  I used scraps thinking I was going to put in two layers. Silly me. I had to recut because I only needed one layer. Those scrap pieces of wood I used to support the end and rail sides made perfect supports for the mattress.  But I did decide that due to adding in batting that I would lower the mattress inside the bed. So I trimmed away a bit careful so that the support pieces still held up the mattress but lower than initially. This pic shows the notches I added.

Now I could play with the fabric actually wrapping it around the mattress.  So the first one I tried was the blue and red mix.  I added pieces of torn paper towel to give me a visual of snow.  My vision is to have a bed that sort of morphs into a snowy village, so I need the bedding to be colorful.  Well, I think I do at this point.


Next I decided I needed to finish the bed itself - the frame color and finish. I wanted to add some sort of decorative design. I had thought about doing some stencil painting. But I wanted something dimensional. So I looked in my stash to see what I could use. I found some paper doilies. I cut some different sections and combined them for the headboard. 

White on red is kinda hard to figure what it will look like so I did a test of various stains and finishes.

I was trying to decide if I wanted to add white back to the design with dry-brushing.  I really like the aged look in the lower right - using a brown stain that I then covered with a gloss.

Next I finished the blue and red fabric as the bed covering as it was the one I liked the most with the red glossy bed. Notice how much darker the red is now with the brown stain.  Also the stain in the nooks and crannies of the design didn't stay as much as I would have liked but I am still pleased with the color and finish.
Also there was a gap between the covered mattress and the sides of the bed.  To solve that I just added some additional fabric to hang down below the mattress into the long rails.

The feet were cut from some spindles I had leftover from another project. 

Then it was time to start adding snow.  I had visions that I would use the plaster cloth to help with draping.  I did use it but in hindsight and other steps, I think I could have done without it.

I removed the plastic after working the cloth and it was completely dry.  The cloth is very wet so the plastic helped to keep the bedding from being messed up.  Also it allowed me to be messier while applying the cloth.  I think using the plastic was a good choice for working with the plaster cloth.
I don't have a picture of the next two stages - I decided I needed to do the lighting. Also I added spackle over the cloth. 
This next pic does show the spackle added and adding the snowtex. When I added the spackle I worked around the lights very carefully.  With the snowtex it was slow going as well.  I added the houses as I went so I could add more snowtex to level the houses.

When adding the spackle and snowtex, I normally use a small palette knife that I have.  For this though I knew I needed even smaller blades to work around the lights and the houses.  I pulled out my clay tools.  Oh my those are fun to use as well.  So I will be using them more often.
In the front at the bottom was a layer I added with spackle that got broken off as I didn't wait for it to dry.  So I have this extra light sticking out.  I decided to move it over in the area to the right. I am actually very pleased with that change despite the re-work it required. 
I tend to do that with lighting - not plan as much as I should. I actually planned to use a string of lights, but then realized after using the plaster cloth that my layout would not work with the string as the placement of the houses wouldn't work.  My answer was to use separate lights and connect them together - all red leads together, all black(green wires with the led's I have) together and then used a coin battery and push button switch.

After adding the snowtex my next step was adding glitter.  I used white glue to do that. Working a small section at time, I applied glue, then the green bits and then glitter.  The glitter stuck to the green bits without adding additional glue. After each section, I shook off the excess. Also when adding the green bits - they looked best added around each house and not so much around the rest of the areas.  So added too much and assessed it at one point and removed some I had added.
As I was adding glitter to the snowtex, I also added it to the roofs.  A layer of glue and glitter, even though the houses already had been glittered.

One important note - when I turned on the lights, the roofs of the houses that I had painted over with white looked so much better. I had one roof I had not painted. I thought I could just use the white card.  It looked fine until the lights were on. Then the light shone through that one house differently. So I had to do something to fix it. I tried adding an additional later of glitter - nope, a layer of white paint on the glitter - nope, so I opened up the house and painted the underside of the roof.  It worked enough that I could finish this project.
The last two steps I did was to add smoke to the chimneys using fiber fill and cleaning up the bed.  I had to fix a spot or two that got messed up and also wipe off the glitter that stuck by static.

So here it is - my sleigh bed village

My favorite little house is that yellow one in the middle, but the others are great too.

And with the lights on

The back...

Those of you who live or have traveled in the South East US, will want to check out the back of the barn.

Tuesday, March 11, 2014

1:144 scale MM Arts & Craft Center

Art in Miniature

In 2013, the theme for the MicroMini yahoo group online convention was announced.  The first thing that came to mind was my semester spent at Appalachian Center for Crafts (ACC).  At ACC they covered 5 different art media: Clay, Glass, Wood, Metal and Fiber.  I took an intro class in both Fiber and in Glass.  Although I really enjoyed my time there, I did decide that it wasn't for me so I didn't continue.  In hindsight, I wish I had pursued a degree in Fine Arts instead, but I digress.
For the convention I decided to offer a workshop, so I came up with this.  I did have to narrow the selection to four media - however I switched to painting as one instead of wood or metal.  I narrowed the selection only due to the size of the cover I wanted to include.  I really prefer having a cover anyway. 
Choosing matchboxes to house this is almost like second nature to me for micro mini or 1:144 scale miniatures.  They capture my love of using unusual containers to make things in for one.  For another they just have a good size for a simple building.  They may not be very deep but that also works if you don't want to get too in-depth into a subject.  Oh and they are also very cheap to use and very easy to work with.
Here is the result of that creation:

Sliders - oh the decisions

I don't know why I was obsessed with a means to open the drawers without touching them.  My last endeavor with matchboxes created a really simple extra end that made it super easy to open them.  See that project talked about on my blog here or just in photos here. I discussed this with my hubby as I really wanted a mechanism that allowed me to turn a knob and open all four of them at once.  Since I had already decided that I was going to do this as a workshop it was critical that it not be too expensive to do or to difficult to do.  Doing it for myself, I could have designed something I was happy with.  But I had decided it would be a workshop so simple won out.  What I ended up with was a single wire and groove for the wire for each studio.  Also each wire comes out an eyelet.  Those made a really nice cover for the hole. 
Here it is with all the drawers out and you can see the sliders:

Filling up the Interiors

 I work full-time and so my mini-time is precious.  I knew I could develop my own kits to go inside, but to make things easier on myself, I contacted Susan K. of sdk minis.  I asked if she would be willing to work with me on providing items to go in my studios.  I had already selected several of her kits to purchase but there were a few others that we worked together to come up with what I wanted.  She also had several new kits she had worked on as well that were right in line with my ideas. 
I ordered a number of kits and then it was time to put them together.  I haven't made that many 1:144 scale kits at once.  I might not have done them all if I hadn't wanted them all finished to show with my workshop.  My workshop was just the studios and artwork to go in them - leaving the actual furnishings to sdk minis kits.
For the student artwork I used a lot of beads and other bits.  I printed a few things for the walls.  I collected images from the internet and resized them down to suit what I wanted.  The most fun was making the Glass artwork.  I will cover that in another blog post.  I will say that I used plastic to make my glass.  Both the window and door glass and the glass artwork were made from plastic.

The Courtyard

In deciding that this was four studios and they were somehow connected, I designed a center courtyard that would be surrounded by the studios.  The matchboxes could then all be seen from the fronts to the outside.  Inside the courtyard I envisioned a place for the students to sit and also for people to visit and see the artwork on display at that time.  This type of artwork can be quite large so I allowed my choice of materials for these to be larger than what went inside.  Although when it comes to artwork, artists seem to love doing larger than life sculptures. 
One idea that I had and clung to longer than I should have was to have beads on the slider wires.  The idea was to have the beads as sculptures at the end of a matchbox.  These had to be such that the beads were sturdy as well as the wires.  While I worked on this, I also clung to the wire I had first decided on.  I choose it simply because I knew it was sturdy - not easily bent, but it was thin.  Unfortunately that thinness was really what wasn't working.  I discarded the idea of the beads on the slider wires as sculpture long before I tried another type of wire.  It was only someone else's suggestion (at my request for suggestions) to try something else that didn't work to pursue the other wire options in my stash.  I share this with you so that maybe you won't cling to an idea that it has to be this when it doesn't appear to be working.  Also it is a reminder to myself to be open to any and all options. 
Here is the results of the courtyard
My choice of cover did limit how the matchboxes could be laid out.  It narrowed the outer sidewalk area to just that.  Also the spacing between them was tight, but I am pleased with the results.  

One of these days I think I would like to create a companion piece that can live next to this one.  It might have a shop for the students to sell their artwork or maybe a metal working studio....

to see more photos of this project - pop over to my picture trail and view its album
and stay tuned for the how to on making the glass art work - coming soon to this blog

Monday, December 17, 2012

1:144 scale Antiques Galore

Recently I was reminded of a project I started a few years ago.  In 2005 I participated in a 1:144 scale swap.  In 2008 I came up with a way to use them.  But it was today when I was able to complete the project.  One unfinished project done and many more to work on...

So here's how I made it.
First this project uses two small cardboard matchboxes.  I combined them by cutting portions off.  I choose to combine them rather than have two separate for additional sturdiness.
While the boxes were cut open, I also cut out my door and windows.  To cut them out, I drew on the box and measured out equal shapes and distance apart.
To add "glass" I used a piece of plastic from packaging.
The glass gets glued to the outside of the box.
Meanwhile I glued the two drawers together.  I added flooring to the bottoms.  The flooring was printed from my computer. 
Then a designed outer walls and a sign on my computer and printed that out.
This was added to the end of the two drawers and also wrapped around the front and end of the box.  I wanted to keep a portion of the matchbox showing.
To add further stability to the box as the folds made it flexible, I added the beams to the roof.  Gluing it down to the base also helped with stability.

I debated about having a door in between the two rooms, but decided I didn't want to waste the wall space.  Matchboxes are narrow so I am not realistic with the area shown, so having  door inside wasn't needed.

I filled in the two inside rooms with the swaps.
From Laura Miller - refrigerator and stove, Linda Austin swapped the shelf with two plates, the brown shelf unit was from Marjon de Haas, the small table with the blue and white planter was from Joan Baker, the quilts and the armoire of quilts was from me.
In back section of the shop was a green dressed bed from Linda Austin, Lauren Rein swapped the round glass topped table, the dresser and pink bed from Alison "Ali" Brand.  The quilts also made by me - printed on cloth.

Fast forward to today,  I added the stone foundation.  It was from paper stone that came in the Micromini convention package. 
I added the white trim around the door and window openings.
I also cut out a sign for the grand opening and painted the lettering.
It didn't take much time today to finish this up, but it did need time to focus on it.
The blue and white bed was made by Rosa from Sweden, the dining room set was maybe a special gift, not sure who it was from.  The two potted plants - on the table and piano - and also the shrubs by the door were from Carol Atchley. The piano was from Anita Nary Hayes.  The black hutch was a painted metal mini.
The left side
The two chaise loungers and the sun umbrella were from Virgina Paton.

From the right side, we can see the barrel cactus in floor pot that was from Laura Miller.
Also note the cat on the steps. 

Sunday, February 12, 2012

1:144 scale Bunny Tails book

In January, I was gifted a the bunny tails book kit made by Robin Betterley.  I had wanted to get it last year for my birthday but had just not gotten to purchasing it.  A fellow club-member was very generous and gifted me the one she had purchased, both the book and the inside kit.  Yeah!!
So I worked on the book in January, but between work, family and college homework I had not been able to finish it.  But today, the time came that I could.  Last night when I realized my homework was done for this week (all but the final printing) I did a happy dance. 

Miniatures are my first love when it comes to a hobby. It is the one thing I have really missed because of my college homework. So when I have had the free time, I have worked on miniatures.  It has been quite a while since I worked on 1:144 scale.  Making this kit did prove challenging to me.  I amazed my family by saying that working in this scale was intimidating.  Of course they think the other scales I do are intimidating.  I was however determined to finish this kit, so I plunged on when I might have put it aside to work on something else or not even miniatures.  There are so many ways to spend our free time and I do have to be in the mood to do miniatures and today was that day.  So indeed I did finish it.  But it was my determination to finish that won out. 

To clarify the kit itself it wonderful, but patience is required. Oh and tweezers are critical as well.  I was very impressed with the quality of this kit. The artwork was fantastic and the detail of the inside kit was really wonderful as well.
One tip is to make sure paint for the inside kit items is thinned (with a little water).  When working with a lot of detail, it is important to apply thin coats.  The wood items had significant detail (love the carrot tops of the bed and the bookcase) and thin coats of paint works.

Here is my finished project:
And here is the insides from a different angle.
I am not happy with the shelf items, so maybe will change that.  But for now it is as it is.  The picture makes them stand out as just paint, but not so bad in real life.