The pics I have show both basic and additional tools, but I will list what I consider basic and recommend for a beginner.
Cutting tools

The second type of craft knife is great for the getting the tip in places the other knife may not go.
Basic tool kit: snap-blade knife - because it is versatile and economical.
Next we have a pencil, need that for marking. Basic - yes
Smaller scissors and bigger scissors, there are times when both are needed so I recommend both sizes. The smaller size is good for smaller trimming and the bigger are for when larger things need to be cut. The smaller size needs to have good points to get in tight spots. Basic: both
Next is a 12" metal ruler. For clean straight cuts metal ruler is a must. Basic - yes
The green cutting matt that is pictured is a small size. A cutting matt is a must but a larger matt would be preferred so that large media can be cut down. I recommend a 12" by 18" size in Basic toolbox.
I do use the smaller matt shown for those times when a smaller size is fine. This would be a great addition for later.
On top of the matt is a triangle. This or a t-square are needed for marking to make square cuts. This one is plastic so I try to avoid making cuts against to avoid damaging it. I would use it to mark and then use the metal ruler for cutting. Basic - yes
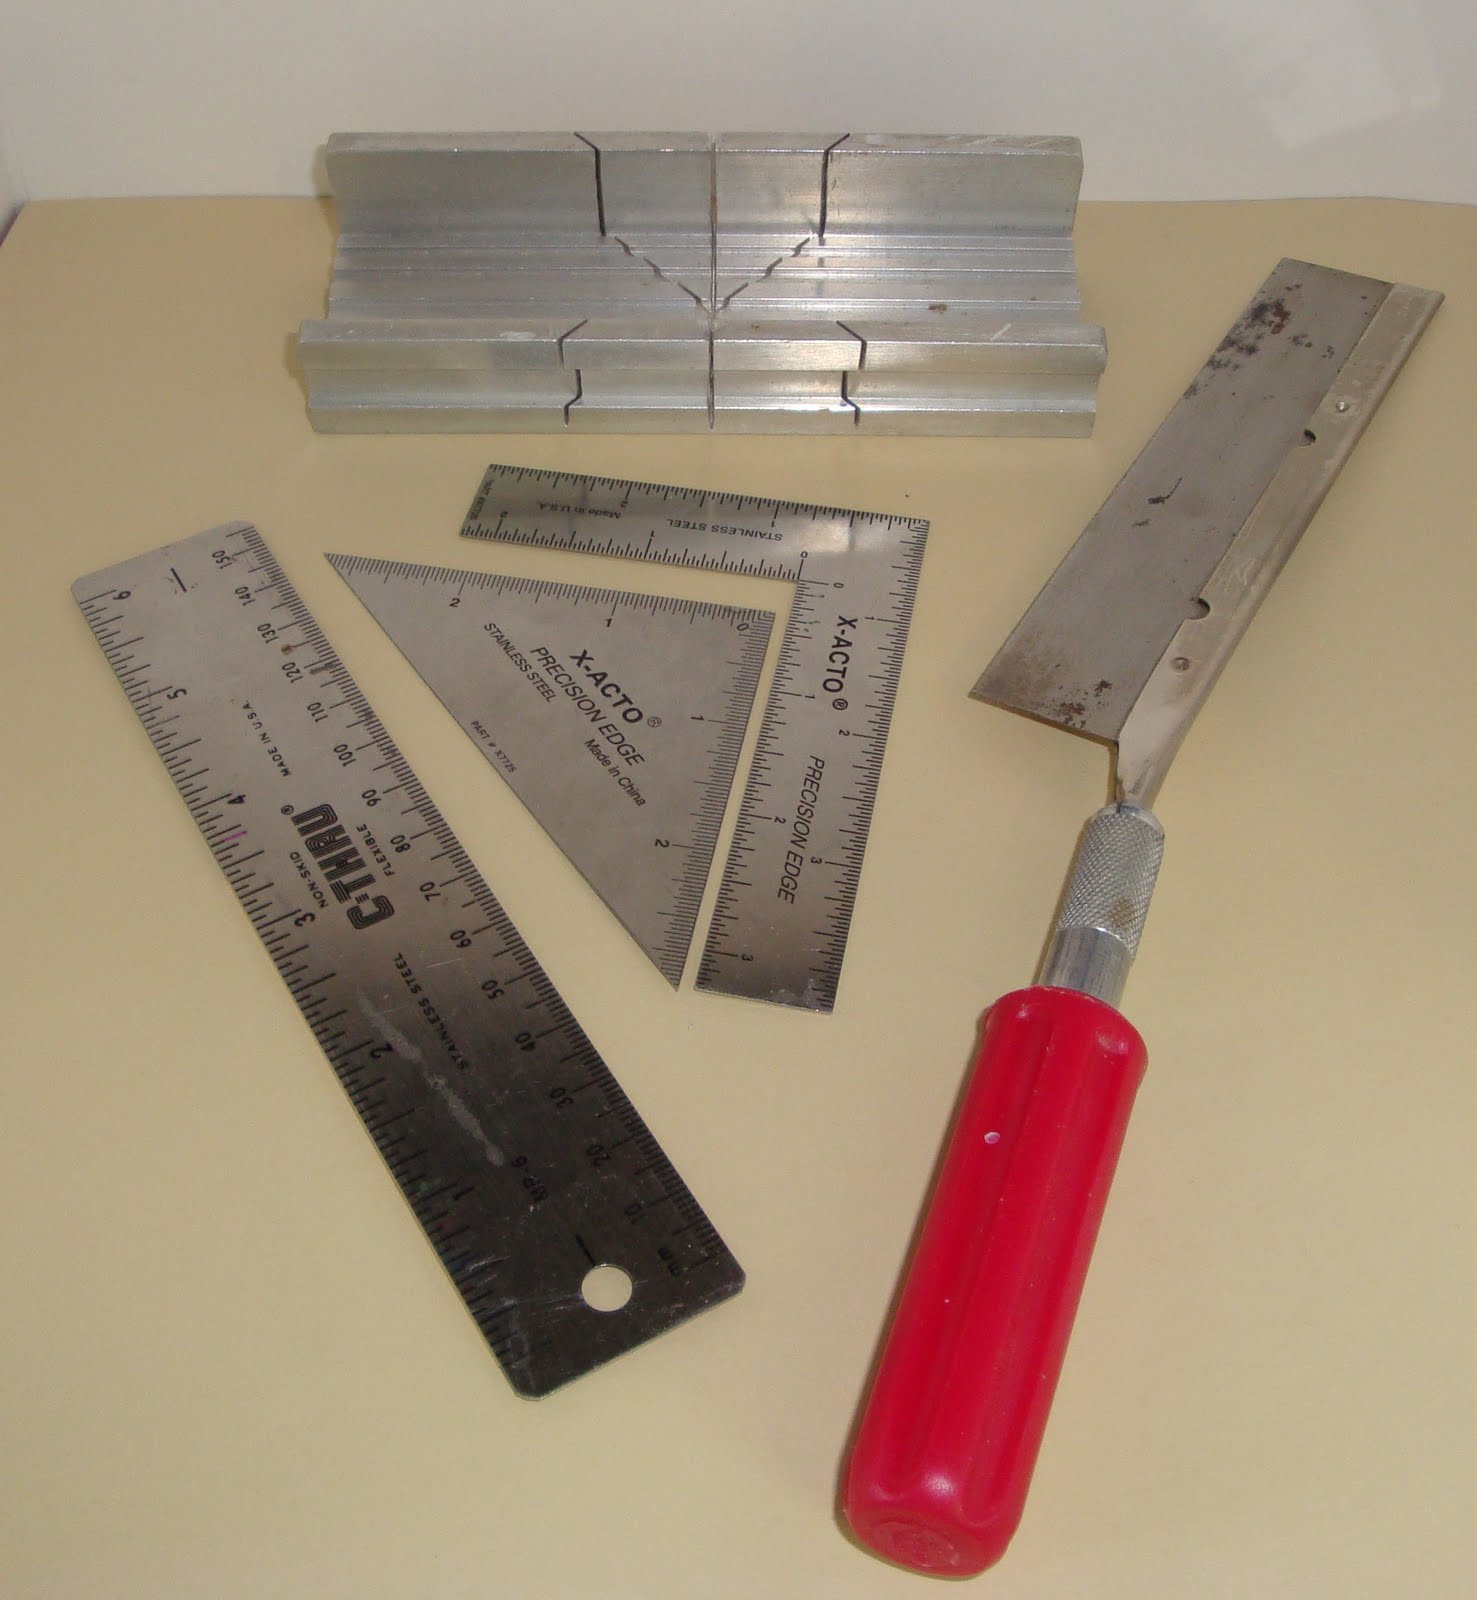
Another tool I have used is the smaller triangle, same reason as the 6" ruler for using this size triangle.
A favorite for working with smaller materials is the mini square L shape. I use this a lot. If I had to choose just one of these three items, then get this one.
The other two tools go together. Metal miter box and saw. This saw happens to be fine tooth and works for most smaller woods much of the time. There is available a rough cut saw and I rarely use mine, but I also have a preac (small table saw). The miter box is great for straight cuts or angles. I use it a lot for cutting wood bits.
One thing not shown that is a must for me is a sharpie marker (fine tip preferred). This is great for when I am making multiple cuts. I mark the metal ruler with the sharpie so I don't have to keep counting those lines. When I done, I use isopropyl (rubbing) alcohol to remove the mark.
GLUES

UPDATE-Jan 3,2015 - I no longer use the Ultimate glue as I had such problems with it stopping/drying up.
My current favorite is Tacky glue - I buy small bottles - I like the glue pen as well.
I also keep on hand, super glue, tacky glue - I like this pen, but a bottle is fine - and some thin body white glue.
I use the super glue for metal and plastic bits that are really small.
White glue for paper spread very thinly.
Tacky is a good glue to use for many things as well. I use it for paper as well.
Any glue for paper such as wallpaper needs to be spread thin and maybe even set up a tad to allow the excess moisture to go. A spreader can be a simple as a scrap of wood or cardboard or an old credit card.
There a couple of paper glues out there such as yes glue and grandmother stovers. I have some and use it, but if I spread the tacky thin and even, I can get by with it.
After applying I also go over the top of the paper with a brayer type tool which is just some to apply even pressure across the surface. I like to use a sharp edge like the credit card.
Also consider wood glue for gluing wood, but I have been pleased with the ultimate for this especially in smaller applications.
One thing I have found about the ultimate glue is that it can seperate. either that or it really does have a shelf life. Not sure which. I found it is good to keep glues like tacky upside down so it is in the top of the bottle for dispensing, but with the ultimate, I switch it back and forth and even lay it on its side so it gets mixed up. I have even shaken it before using as I have had a bottle or two seperate and be runny.
I love tip bottles (small bottle with a metal tip) but they are hard to clean. I keep small juice glasses to store my tip bottles in. However if I have been lazy and not cleaned out the tip I rely on the toothpick for my applicator instead of the tip. Squeeze glue in a bottle lid and dab with a toothpick or a hat pin.
SANDING and it's not just for wood

I also like the other nail file type sander and the nail file foam block (two far right items). Both of these have two grits that I can use much of the time.
The other needle file I have pictured (in the middle) is half round. I like the roundness for shaping curves. I have several other needle files, but I grab the wedge or half round the most.
Sanding is important to give a piece that finished look. It may not take much but that extra may make the difference in how good it looks.
I do have sandpaper, but I like these tools as they have stiffness to them that helps keep me straight.
Another 'sanding' tool is the smaller scissors. When wood is cut it tends to fray a bit, it is quick to use the scissors to snip this off instead of sanding as the sanding might change the size or shape if not careful.
Another 'sanding' tool is a craft knife. Sometimes when sanding, the edges just keep fraying. This is especially true of plastic. I use the craft knife to scrap away the fray.
TWEEZERS - must have a least one good pair.

I like the curved pair for getting around something. The third pair have a sliding lock which is good when needing to hold something without squeezing the tweezers. These aren't for tight holds but in general will keep it in place.
I do not like the pinching type tweezers that pinch the middle to open. Personal preference, maybe. I have concerns with marring the piece I have holding, but try them to decide for yourself.
Painting

Also pictured is a roll of paper towels that I have cut in half using my snap blade knife because it makes a long blade and can get to the core. I find the half size handy, but typically will tear it in the middle. So if I bought the half sheet perforated style and then cut it in half might be even better.
A cup for water, I like to go smaller to force myself to replace the water more often. Doesn't always work, but I try. Rinsing a brush and not leaving it sitting is really good idea. I am very hard on brushes so I don't have top of the line. I like sable brushes but the two flats pictured are cheaper brushes and for the usage I use them for are great. The type of bristle does matter, so I avoid coarser brushes as they to me are a waste of money.
The big brush on the right is not for painting but for dusting. I use a power makeup brush to dust my precious minis as they do sometimes succumb to that if they are not covered.
No comments:
Post a Comment